| 일 | 월 | 화 | 수 | 목 | 금 | 토 |
|---|---|---|---|---|---|---|
| 1 | 2 | 3 | 4 | 5 | 6 | 7 |
| 8 | 9 | 10 | 11 | 12 | 13 | 14 |
| 15 | 16 | 17 | 18 | 19 | 20 | 21 |
| 22 | 23 | 24 | 25 | 26 | 27 | 28 |
- 웹개발자
- JS
- Redux
- 큐넷
- JWT
- 스프링부트
- security
- Authentication
- spring
- VUE
- 리액트
- 수제비
- spring boot security
- It
- 백엔드개발자
- spring boot
- frontend
- 타입스크립트
- Front-End
- 프론트엔드
- TS
- 정보처리기사 실기
- 자바스크립트
- React
- Node.js
- useState
- 정보처리기사
- 백엔드
- JavaScript
- TypeScript
- Today
- Total
솔적솔적
Spring Boot Security - 환경설정 & 시큐리티 설정 본문
사용 DB : MySQL
사용 tool : Spring Boot (sts-4.11.0.RELEASE)

먼저 프로젝트를 만들 때
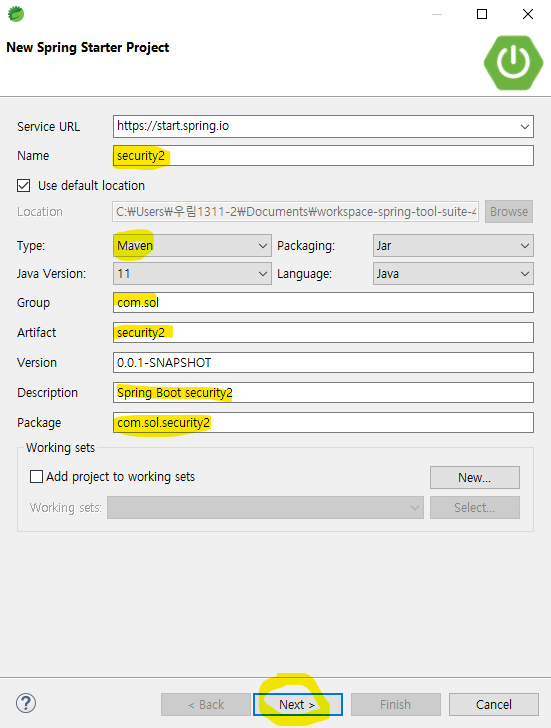
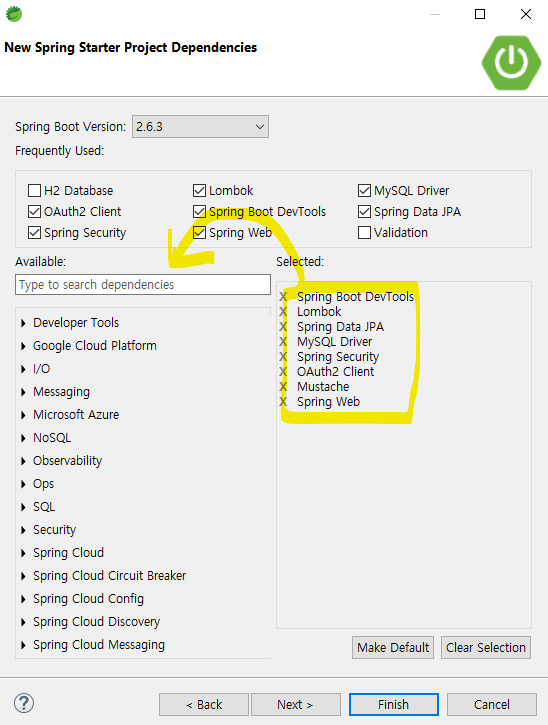
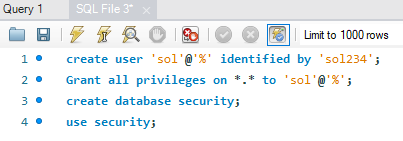
MySQL에 들어가서
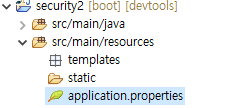
프로젝트 셋팅이 다 이뤄지면 src/main/resources안에 application.proerties를 yml파일로 변경
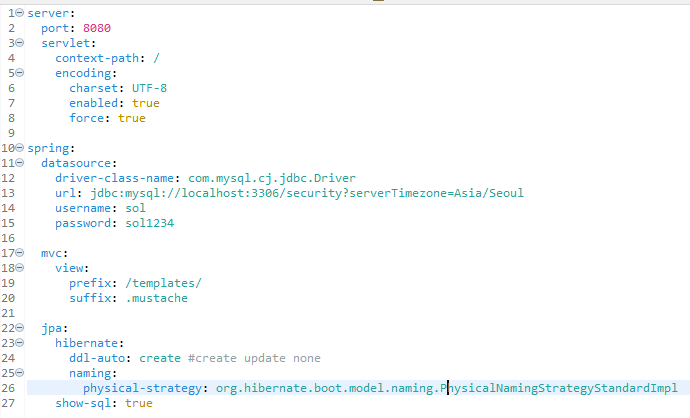
com.sol.security2안에 Config 패키지 생성,
com.sol.security2안에 Controller 패키지 생성하고 IndexController생성

그리고 코드를 짤 때 템플릿엔진을 mustach를 설정파일을 안에 넣어 사용

머스테치 기본폴더 src/main/resources/
뷰리졸버 설정 시 : templates를 prefix로 잡고 , .mustache를 suffix로 잡아 세팅한다.
원래 application.yml부분에

입력하여 놨었으나 이건 없어도 괜찮다. 왜 없어도 가능할까?
그건 아까 보여줬듯이 우리가 머스터치를 사용하겠다고 의존성 등록을 해줬기 때문이다.
웹브라우저로 보여줄 html파일 만들기
temlates안에 index.html 생성

config패키지 안에 WebMvcConfig.java 생성
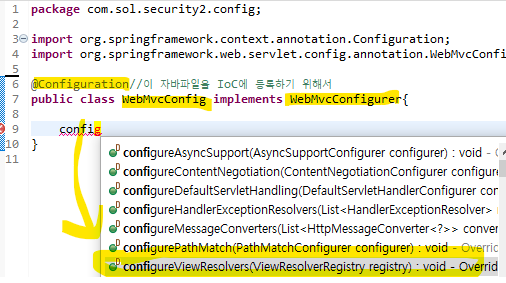
오버라이딩 후 내부 구성짜기
해당 뷰리졸버, Mustache를 재설정하기 위한오버라이딩
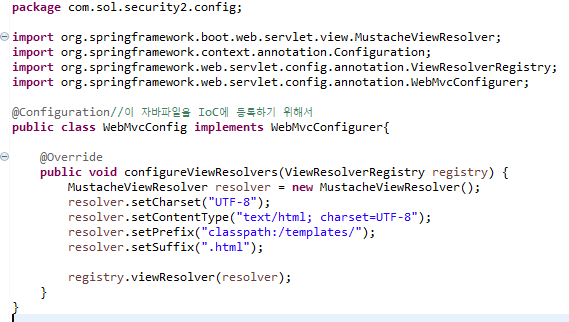
resolver.setCharset("UTF-8"); → 내가 만든 view에 인코딩은 기본적으로 UTF-8로 설정한다.
resolver.setContentType("text/html; charset=UTF-8"); → 너한테 던지는 데이터는 html 파일이고 이 파일이 UTF-8이다.
resolver.setSuffix(".html"); → html으로 바꾸면 머스터치가 인식을 한다.
실행 후
console에
Using generate security password가 나온다.
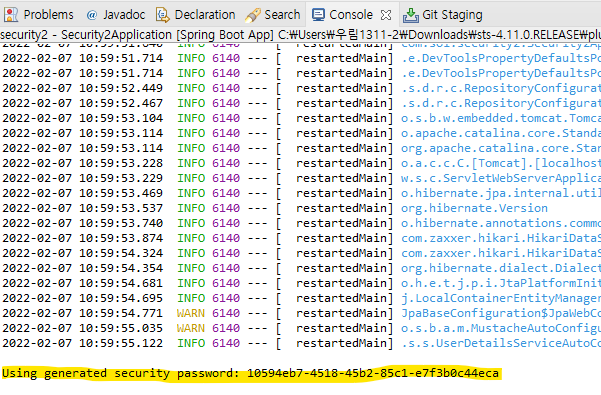
localhost:8080을 검색하면
이런 화면의 로그인 페이지로 이동하게된다.

어? 아까 html파일에 <h2>첫 페이지</h2> 라고 해서 작성한 것이 떠야하는거 아닌가?
하지만,
시큐리티로 의존성을 설정하게되면 홈페이지로 들어가는 모든 주소가 바뀌어 인증하는 홈페이지가 된다.
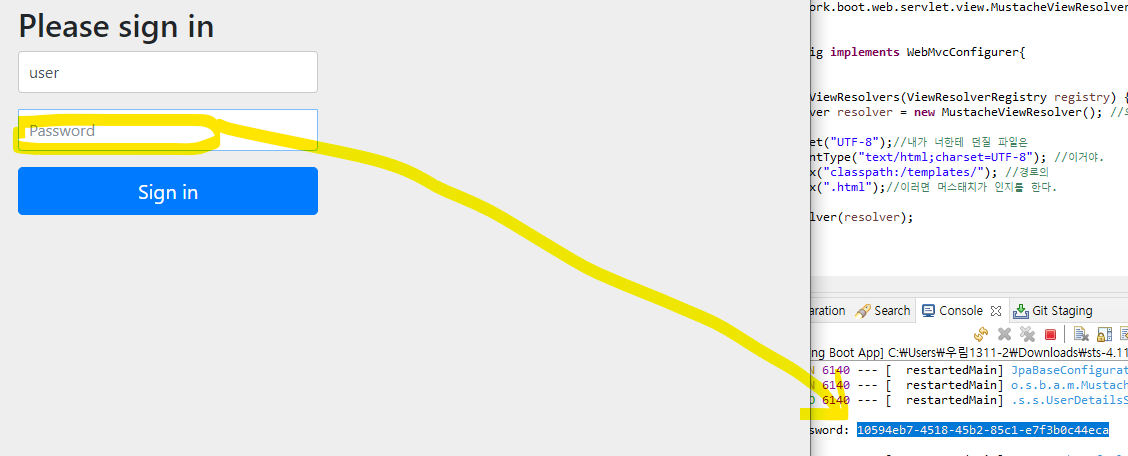
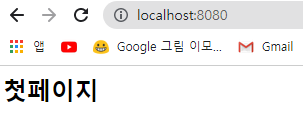
아이디와 비밀번호를 입력할 때 아까 console에 나온 (Using generate security password)을 비밀번호에 넣는다면 아까 만든 index.html에 써 놓았던 '첫 페이지'라는 글자가 보이게된다. 이게 정상작동.
| 시큐리티 설정
indexController에 들어가서
	@GetMapping("/user")
	public @ResponseBody String user() {
		return "user";
	}
이런 식으로 admin, manager, login, join 각 웹 브라우저로 이동하는 경로화면들을 작성한 후 확인해본다.
config패키지에 SecurityConfig라는 이름의 클래스를 생성한다.
@Configuration
@EnableWebSecurity
public class SecurityConfig extends WebSecurityConfigurerAdapter{

	@Override
	protected void configure(HttpSecurity http) throws Exception {
		http.csrf().disable();
		http.authorizeRequests()
		.antMatchers("/user/**").authenticated()
		.antMatchers("/manager/**").access("hasRole('ROLE_ADMIN') or hasRole('ROLE_MANAGER')")//이 권한이 있는 사람만 들어올 수 있게한다.
		.antMatchers("/admin/**").access("hasRole('ROLE_ADMIN')")
		.anyRequest().permitAll()
여기서 @EnableWebSecurtiy → 스프링 시큐리티 필터가 스프링 필터 체인에 등록이된다.
manager와 admin쪽으로 들어오게되면
hasRole('ROLE_ADMIN') or hasRole('ROLE_MANAGER') 이 권한이 있는 사람만 들어올 수 있도록 설정한다.
403 권한이 없는 페이지에가 나올 시 login 페이지로 이동되도록하기 위한 코드
package com.sol.security2.config;

import org.springframework.context.annotation.Configuration;
import org.springframework.security.config.annotation.web.builders.HttpSecurity;
import org.springframework.security.config.annotation.web.configuration.EnableWebSecurity;
import org.springframework.security.config.annotation.web.configuration.WebSecurityConfigurerAdapter;

@Configuration
@EnableWebSecurity
public class SecurityConfig extends WebSecurityConfigurerAdapter{

	@Override
	protected void configure(HttpSecurity http) throws Exception {
		http.csrf().disable();
		http.authorizeRequests()
		.antMatchers("/user/**").authenticated()
		.antMatchers("/manager/**").access("hasRole('ROLE_ADMIN') or hasRole('ROLE_MANAGER')")//이 권한이 있는 사람만 들어올 수 있게한다.
		.antMatchers("/admin/**").access("hasRole('ROLE_ADMIN')")
		.anyRequest().permitAll()
		.and()
		.formLogin()
		.loginPage("/login");
	}
}
이제 어디로 가든(admin의 경로를 찍든, manager로 경로를 찍든) login 경로로 이동되어 웨브라우저에 보여지게된다.
[참고] - 인프런 시프링 부트 시큐리티& JWT 강의
'Back-end > Spring Boot Security' 카테고리의 다른 글
| Spring Boot Security - Authentication 객체가 가질 수 있는 2가지 타입 (0) | 2022.02.09 |
|---|---|
| Spring Boot Security - 구글 로그인,구글 회원 프로필 정보 받기 (0) | 2022.02.08 |
| Spring Boot Security - 시큐리티 권한 처리 (0) | 2022.02.07 |
| Spring Boot Security - 시큐리티 회원가입, 로그인 (0) | 2022.02.07 |
| Spring Boot Security - 인증과 인가 그리고 JWT에 대해서 (0) | 2022.02.07 |


